Fall Auditions | August 19 – 26 | NOW CLOSED
The opportunity to audition for BYSO will be for our 2022-2023 season is now closed. Results will be emailed no later than September 16. If you were unable to submit and audition video and are still interested in joining BYSO, our next round of auditions will be held live and in-person on December 5 for out Winter and Spring quarters. Audition selections will be the same.
If you have any questions, please email auditions@byso.org
Fall Audition Instructions
Audition Preparation
Refer to the Audition Levels and select the most advanced level of audition material that you feel comfortable with and can play well. Aim for the suggested metronome markings when indicated, but remember that it is always more important to play accurately, demonstrating good tone and intonation. Sight-reading is also a component of orchestral placement considerations and is part of the audition.
Keep in mind that preparing material for a certain level does not ensure placement at that level. Your placement will be based on your demonstration of these standards at the audition.
Please review the demonstration video. Upload directions can be found here.
If you have questions, please review all the information in the Enrollment section of the website. If you are still having issues, please contact us at auditions@byso.org with questions.
Audition Video Recording Guidelines
Required Video Components
1. The audition video is to be performed like a live audition, in a single take with no editing or alterations. The order of the components of your audition video should be as follows:
- State your full name
- State your scale(s); example: “3 octave A Major scale”.
- Perform your scale(s) – approximately one minute
- If required for your chosen orchestra level, state your prepared excerpt/etude; example: “Dance Etude track 2”.
- Perform your prepared excerpt/etude (if required for your chosen orchestra level) – approximately one minute
- State your solo piece with full title, name of composer, movement; example: “Minuet in G Major by Ludwig van Beethoven, first half”.
- Perform your solo piece – maximum two minutes
- State your level of sight-reading; example: “level 4”.
- Perform your sight-reading excerpt – approximately one minute
2. Scales: Select your scales based on your instrument and chosen orchestra on the website, follow tempo markings as best you can. Do not record your audition video with a metronome on.
3. Excerpt/Etude: Required excerpts/etudes vary from instrument and orchestra level, check the website for your specific set of requirements.
4. Solo: The music you choose should display contrasting styles and show your highest level of achievement, no longer than 2 minutes of music. Auditions must be recorded without accompaniment.
5. Sight-reading: Select your sight-reading excerpt according to the orchestra you would like to audition for.
3. Your audition components (scales, solo piece, excerpts/etude) must be completed in one take so only one video is submitted.
4. Memorization is not required and will not factor into your scoring.
5. Your audition video should be around 5-7 minutes long.
6. Make sure to include your first and last name in the video file link.
Sight Reading Instructions
1. Sight reading will be generated using sightreadingfactory.com. Please familiarize yourself with the website before you start recording.
2. Select your level according to the chart below.
3. Click on “Try it for free” on the main page.
4. Click on your instrument group, i.e. strings, winds, brass, or percussion.
5. Click on your instrument, i.e. violin and appropriate clef if needed (viola treble clef).
6. Click on your level, 1 through 6.
7. Click on your time signature, i.e. 4/4.
8. Click on your key signature, i.e. “random key signature.”
9. Click on “Challenge mode.”
10. In the upper right hand corner, adjust the metronome tempo with the arrows.
11. Click on “Cursor On” to turn it off. Leave the Metronome on.
12. Have this screen you’ve just set up ready to go at the start of your recording. When you are ready to perform your sight-reading, click “Start” at the button to begin your sight-reading. You will have a 30-second countdown to study the excerpt without making any sounds on your instrument, after which you will receive a metronome count down in tempo.
13. You are allowed to practice sight-reading excerpts with Sightreading Factory, but you only have 20 free trials, so use your practice time wisely!
14. Below is a chart for all orchestras and instrument groups, including settings for levels, time signature, key signature, and tempos.
| Orchestra | Instruments | Level | Time Signature | Key Signature | Tempo |
| Youth | Strings (violin and bass) | 6 | 4/4 | random | 94 |
| Viola (treble clef) | 6 | 4/4 | random | 94 | |
| Cello (tenor clef) | 6 | 4/4 | random | 94 | |
| Winds | 6 | 4/4 | random | 94 | |
| Bassoon (tenor clef) | 6 | 4/4 | random | 94 | |
| Brass | 5 | 4/4 | random | 94 | |
| Philharmonia | Strings (violin and bass) | 5 | 4/4 | random | 90 |
| Viola (treble clef) | 4 | 4/4 | random | 90 | |
| Cello (tenor clef) | 5 | 4/4 | random | 90 | |
| Winds | 4 | 4/4 | random | 90 | |
| Bassoon (bass clef) | 4 | 4/4 | random | 90 | |
| Trombone (bass clef) | 4 | 4/4 | random | 90 | |
| Brass | 4 | 4/4 | random | 90 | |
| Sinfonia | Strings | 4 | 4/4 | random | 88 |
| Winds | 3 | 4/4 | random | 88 | |
| Brass | 3 | 4/4 | random | 88 | |
| Premiere | Strings | 3 | 4/4 | Bb Major | 90 |
| Winds | 2 | 4/4 | D Major | 90 | |
| Brass | 2 | 4/4 | D Major | 90 | |
| Debut | Strings | 2 | 3/4 | C Major | 94 |
| Cadet | Strings | 1 | 4/4 | D Major | 60 |
| Percussion | Percussion | 2 | 4/4 | random | 76 |
| Flute Choir | Flute | 3 | 4/4 | random | 88 |
| Flute Orchestra | Flute | 4 | 4/4 | random | 90 |
Video Quality Instructions
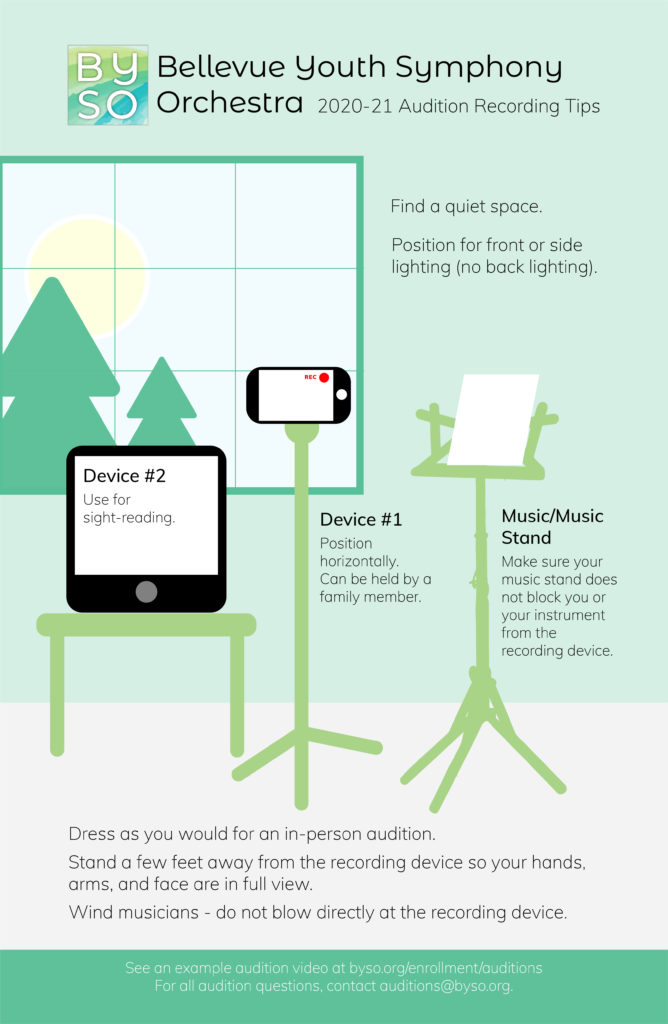
1. Lighting: Record in a well-lit space. Make sure there is more light in front of you rather than behind you so that you are not back-lit.
2. Landscape orientation: Film in landscape (horizontal) orientation. Make sure the microphone area is unobstructed.
5. Video framing: Place the video recording device so that you, your instrument, and your full range of motion are in the frame at all times. Make sure your music stand does not cover your face, instrument, arms/hands and range of motion. The faculty must be able to see your instrument to be able to observe your technique.
6. No editing: Picture must remain stationary with no panning, zooming, multiple cameras, or fading in/out. You may not edit, cut, splice, or otherwise alter your performance.
See a set-up diagram below.
Example Recording Setup
Audio Quality
1. Recording space: Record in a quiet space with no interruptions. Check sound levels beforehand to make sure sound is not distorted in loud passages and inaudible in soft passages. Be mindful of your instrument’s loudest volume, the size of the room, and test your room’s acoustics.
2. Woodwind and brass musicians: make sure your bell does not point directly at the recording device, but rather slightly off-center.
3. String musicians: make sure the face of your instrument faces the recording device so we can see both your left-hand and your bow arm technique.
5. Spoken introductions: Be mindful that your voice will be at a lower volume than your instrument. Speak a little slower, loudly and confidently when stating your name, scales, solos, and excerpt/etude.
Other Tips
1. Planning your audition video is essential. We strongly encourage you to work with your private studio teacher when preparing an audition.
2. Predetermine what section or sections of your solo piece you are going to play.
3. Having another person in the room may be helpful if you need to adjust something or to press record and stop. However, that person may not coach or guide your audition.
4. Dress comfortably and nicely, as you would for a job interview.
5. You may multiple takes of your audition, and only submit the recording which best represents your playing.
6. Make sure you are tuned to A = 440.
The video and audio quality of your device will not be a factor for adjudicators to determine your orchestra placement.
When you have your audition uploaded, you can fill in the registration form. Please have your link and credit card handy when you begin the form.